12V Wiring for Your Ford 8N Tractor: A Comprehensive Guide
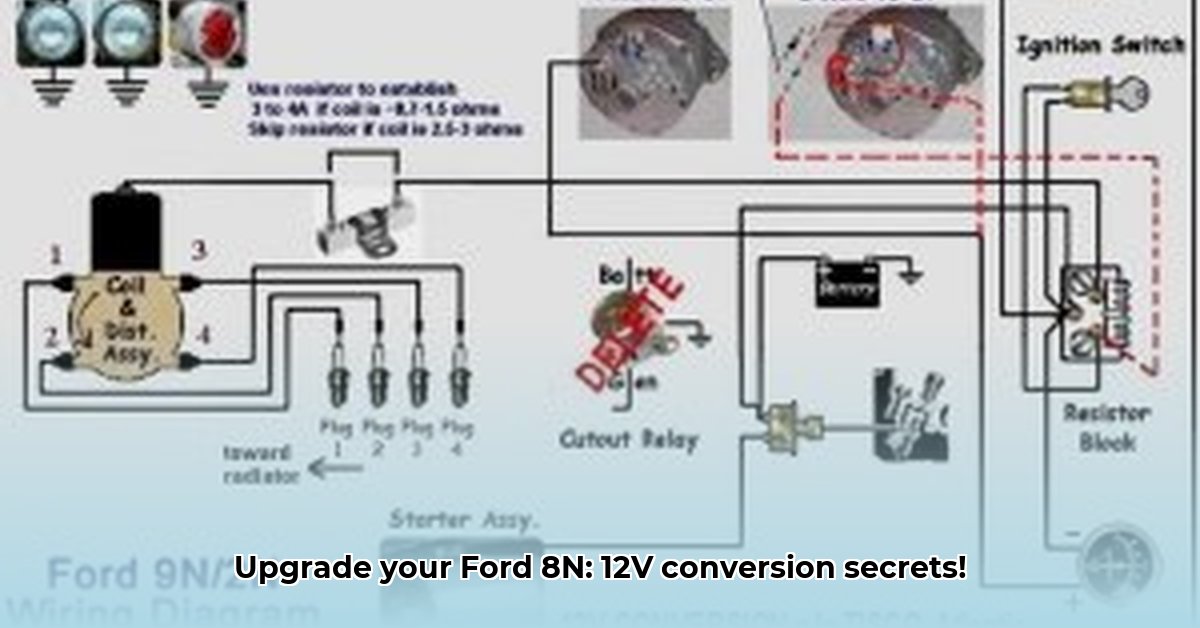
Revitalizing your classic Ford 8N with a 12-volt electrical system offers significant performance and functionality improvements. This step-by-step guide details the safe and effective upgrade process. Prioritizing safety throughout is crucial. This conversion isn't overly complex, but meticulous attention to detail is rewarded with a reliable, modernized system. For a helpful visual aid, check out this wiring diagram.
Getting Started: Tools, Parts, and Safety Precautions
Before beginning, gather all necessary tools and parts. A well-organized approach minimizes frustration. Here's a complete checklist:
Parts:
- 12-Volt Battery: (Select a battery with the correct size and amperage for your 8N model. Consult your tractor's manual or a parts supplier for specifications.)
- 12-Volt Alternator: (Verify compatibility with your specific 8N model. Incorrect alternators will not function correctly.)
- Wiring Harness: (A pre-made kit simplifies the process. Otherwise, prepare for custom wiring, which requires careful attention to detail and a clear wiring diagram.)
- 12V Voltage Regulator: (Essential for regulating the alternator's output voltage. Choose one with overvoltage protection for enhanced system longevity.)
- 12V Starter Motor: (Ensure compatibility with your tractor model and the new 12V system.)
Tools:
- Assorted connectors, wire crimpers, heat-shrink tubing, and electrical tape (high-quality materials are crucial for dependable connections)
- Wire strippers/cutters and a soldering iron with solder (soldering ensures neat and reliable connections)
- Multimeter (essential for checking voltages and ensuring proper system operation)
- Wrench set and screwdrivers (for various tasks during disassembly and installation)
- Reliable 8N Ford tractor wiring diagram (indispensable for accurate wiring)
Safety Gear:
- Safety glasses (protect your eyes from flying debris)
- Work gloves (protect your hands from cuts and abrasions)
Safety is paramount: Always disconnect the negative battery terminal before commencing any work. Working with electricity demands utmost caution. A well-ventilated area minimizes the risk of fume inhalation.
The 12-Volt Conversion: A Step-by-Step Process
This conversion replaces the original 6-volt system with a modern 12-volt system. Constant reference to your wiring diagram is essential. Take your time; rushing increases the chances of mistakes.
Step 1: Disconnect the Battery: As previously emphasized, disconnect the negative battery terminal completely. This is your first and most important step.
Step 2: Removing the Old System: Carefully remove the old 6-volt battery, alternator, starter motor, and associated components. Detailed photographs or labeled wiring diagrams are incredibly useful.
Step 3: Installing the New Battery: Securely mount the new 12-volt battery in the designated location. Ensure it's firmly secured to prevent shifting or damage.
Step 4: Installing the New Alternator and Starter Motor: Mount the new 12-volt alternator and starter motor according to the instructions and wiring diagram. Double and triple check connections; secure them tightly.
Step 5: Wiring the System: This is the most critical stage. Accurately follow your wiring diagram, noting wire colors, terminal locations, and proper gauge wiring for each circuit. Secure each connection meticulously with solder and heat-shrink tubing for durability and safety. A negative ground system (chassis as ground) is typically used.
Step 6: Ammeter Modification: The ammeter reading changes with the 12-volt system. Your wiring diagram should outline the correct ammeter wiring for precise 12-volt readings. Incorrect wiring leads to inaccurate measurements.
Step 7: Testing and Verification: After wiring, carefully reconnect the battery negative terminal. Use your multimeter to thoroughly check voltages at various points in the system. The alternator should correctly charge the battery, and all circuits should operate as expected. A fully charged battery should read approximately 12.6V. An operating alternator under load should be in the 13.5-14.5V range. Is it critical to double-check all connections? Absolutely!
Troubleshooting Common Issues
Even with meticulous planning, problems can arise. Here are some common issues and their solutions:
- Dim Lights: Inspect all connections for tightness and corrosion. Check for broken or damaged wires. Confirm the alternator's charging capability.
- Dead Battery: The alternator might have failed to charge. Test its output using the multimeter. Inspect wiring for faults, especially in the charging circuit.
- Inaccurate Ammeter Reading: This often indicates improper ammeter wiring. Refer to your wiring diagram to ensure correct connections.
Weighing the Decision: 12V Conversion Advantages and Disadvantages
Before proceeding, consider the following:
Advantages:
- Increased power for accessories
- Readily available replacement parts
- Improved starting performance
- More efficient overall system operation
Disadvantages:
- Requires significant rewiring and attention to detail
- Potential for mistakes without careful planning
- Cost of new parts
- May require specialized knowledge or assistance
Conclusion: A Modernized 8N
Upgrading your Ford 8N to a 12-volt system significantly enhances performance and convenience. While it takes patience and attention to detail, the rewards are substantial. Consistent reference to your wiring diagram and seeking expert advice when needed improves your chances of success. A well-executed conversion ensures a reliable and long-lasting system.